 Save
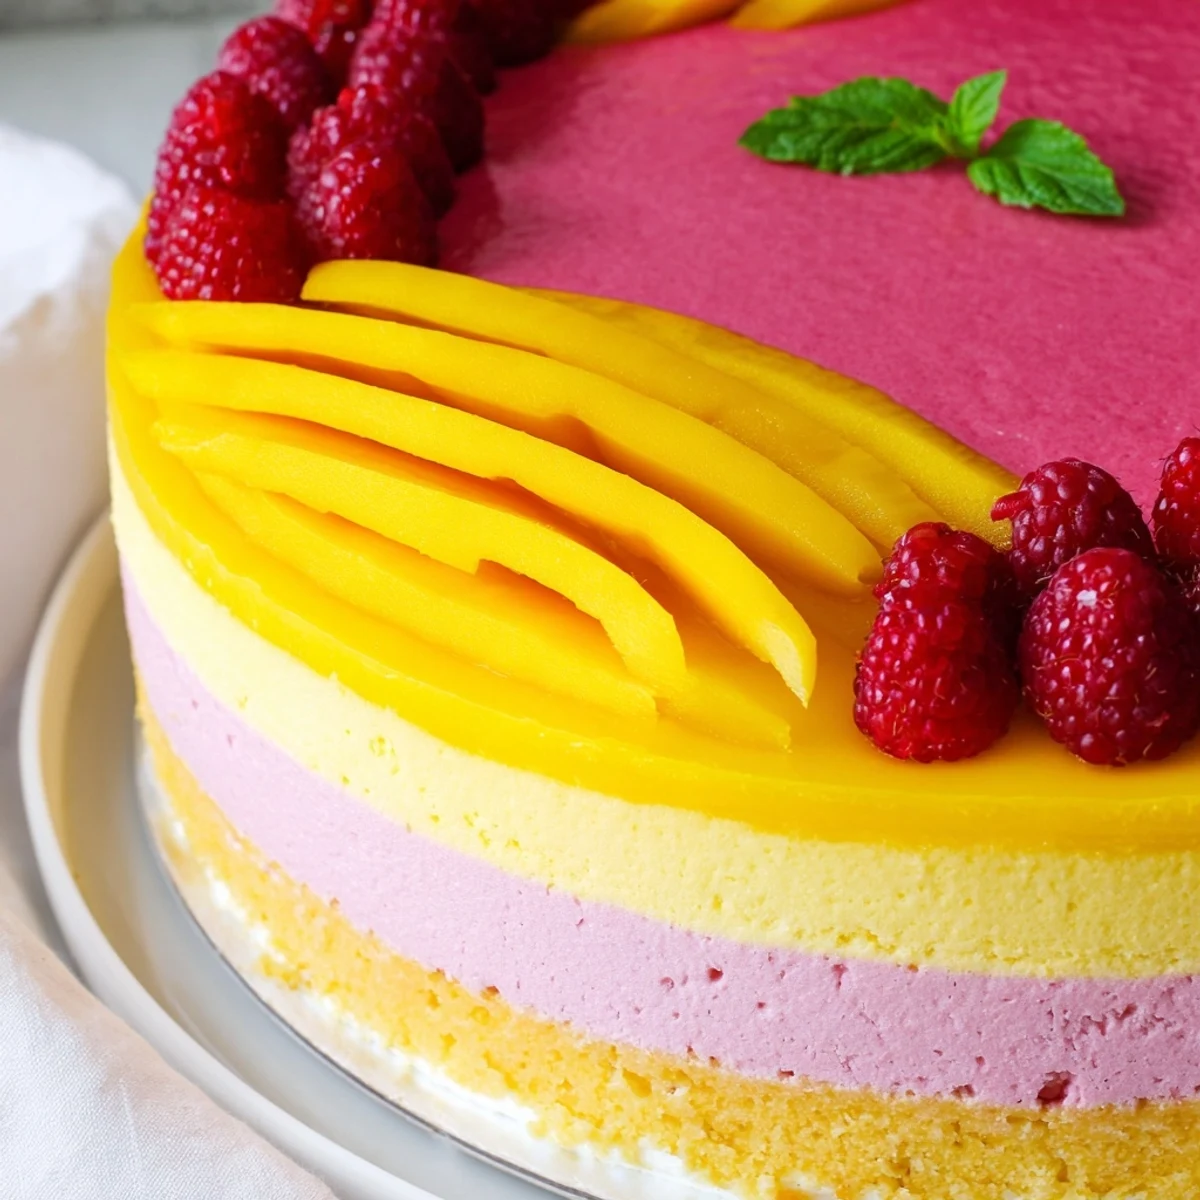
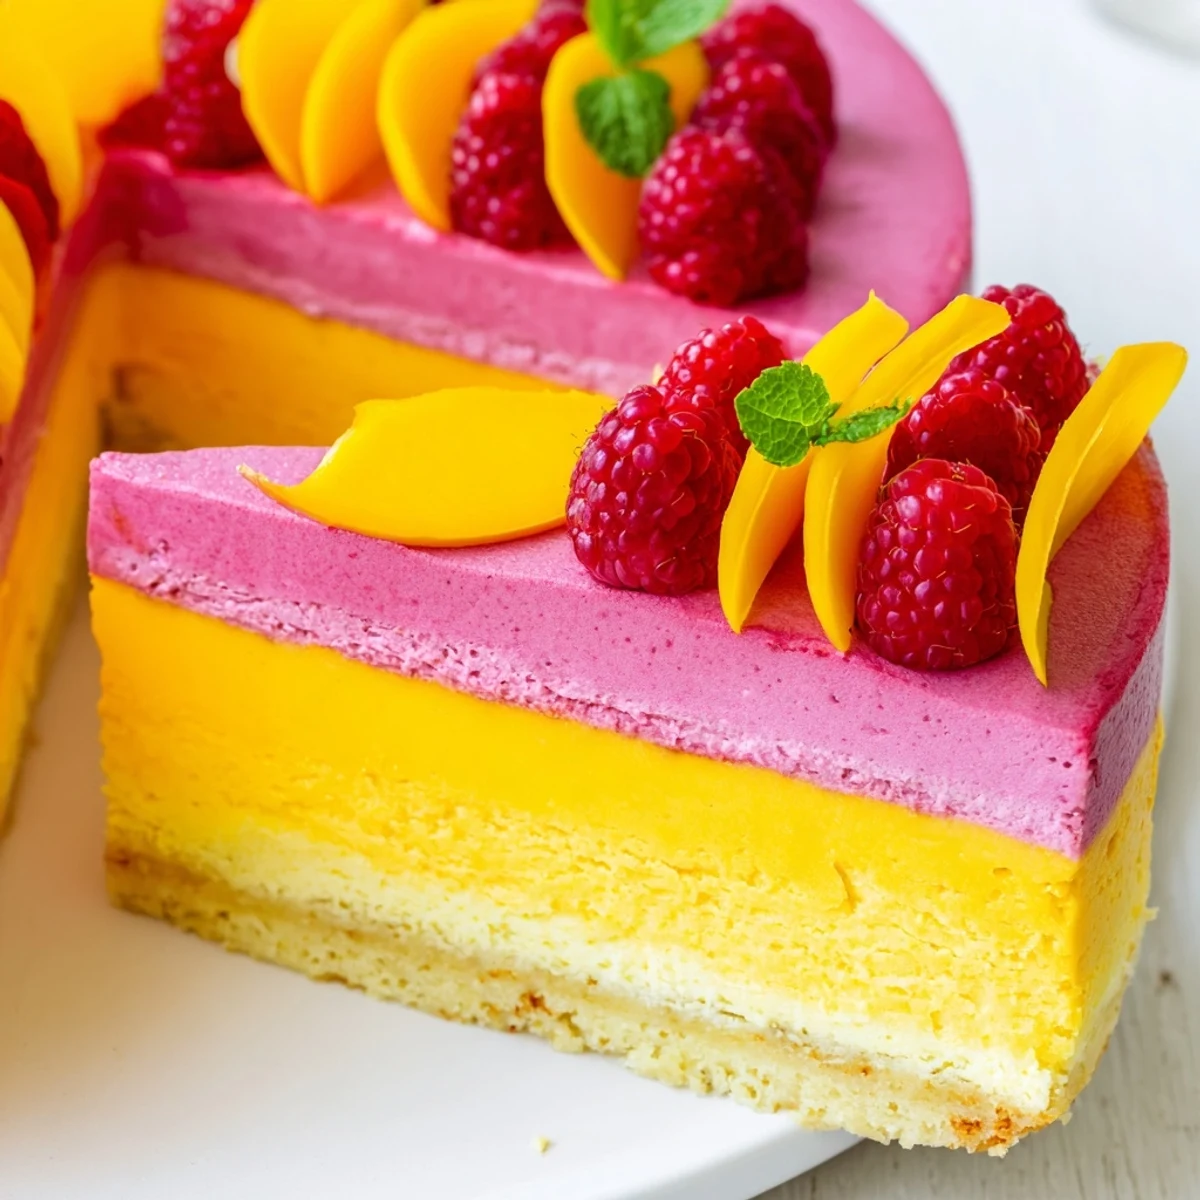
Save Create stunning layers of tropical mango and vibrant raspberry mousse atop a tender vanilla sponge. This airy dessert combines ripe mango puree with fresh raspberry infusion, each lightened with whipped cream and set with gelatin. The result is an elegant, fruity masterpiece that balances sweetness and tartness beautifully.
Plan ahead as this requires chilling time for each layer to set properly. The sponge base provides structural support while remaining subtle in flavor, allowing the fruity mousses to shine. Fresh fruit garnish adds visual appeal and extra brightness.
The first time I made this layered mousse cake, it was for my sister's summer birthday and I was terrified the layers would slide into each other. But when I sliced into that chilled cake and saw those perfect horizontal stripes of golden mango and bright pink raspberry, I felt like a pastry wizard. Now every summer I find myself reaching for fresh mangoes and raspberries, because nothing makes people gasp quite like cutting into this dessert.
Last July I made this for a dinner party and one guest actually asked what bakery I bought it from. I love watching peoples faces when they realize its homemade, and how the conversation always stops when that first slice is served. Something about the visual drama of those layers makes every occasion feel special.
Ingredients
- 3 large eggs: Room temperature eggs whip up fluffier and incorporate more air into your sponge base
- 90 g granulated sugar: This amount sweetens without making the cake too dense, letting the fruit shine
- 90 g all purpose flour: Sifted twice helps prevent lumps and ensures an even, tender crumb
- 1 tsp vanilla extract: Pure vanilla adds depth that complements both mango and raspberry
- Pinch of salt: Just enough to brighten flavors and balance the sweetness
- 300 g ripe mango flesh: Choose mangoes that yield slightly to pressure, with fragrant stems
- 50 g granulated sugar for mango mousse: Adjust based on fruit sweetness, I taste as I go
- 2 tbsp fresh lime juice: Heightens the tropical mango flavor and cuts through rich cream
- 250 ml heavy whipping cream: Must be thoroughly chilled, or it wont hold those crucial medium peaks
- 6 g powdered gelatin: This gives structure while keeping the mousse silky smooth
- 3 tbsp cold water: Cold water blooms gelatin properly, preventing grainy texture
- 200 g fresh or frozen raspberries: Frozen work perfectly if fresh are out of season
- 50 g granulated sugar for raspberry mousse: Raspberries need more sugar than mango to balance their natural tartness
- 1 tbsp fresh lemon juice: Makes the raspberry flavor pop and adds brightness
- 200 ml heavy whipping cream: Same chilling rule applies, cold cream is non negotiable here
- 5 g powdered gelatin: Slightly less than mango layer since raspberry puree has more natural pectin
- 2 tbsp cold water: Consistent temperature helps the gelatin dissolve evenly
- Fresh mango slices and raspberries: I go generous here, more fruit on top means more wow factor
- Mint leaves: Optional but I love the contrast of green against all that coral and gold
Instructions
- Bake the Foundation:
- Preheat your oven to 180°C and line a 23 cm springform pan with parchment paper. Beat those room temperature eggs with sugar until the mixture turns pale and doubles in volume, about five full minutes of whipping. Gently fold in vanilla, salt, and sifted flour until just combined, then pour into your prepared pan and bake for 12 to 15 minutes until golden and springy to the touch. Let it cool completely in the pan, resisting any urge to remove it early.
- Prepare Mango Mousse Magic:
- While the cake cools, sprinkle gelatin over cold water and let it soften for about five minutes. Puree your diced mango with sugar and lime juice until completely smooth, then gently warm it in a small saucepan just enough to melt the gelatin when you stir it in, taking care not to let it boil. Let this mixture cool to room temperature while you whip your cream to medium peaks, then fold everything together with a light hand until no white streaks remain.
- Layer the Mango:
- Spread your mango mousse evenly over the cooled sponge base, using an offset spatula to smooth the top. Refrigerate for exactly 30 minutes, setting a timer because this layer needs to be firm before you add the raspberry mousse on top. This wait feels long but prevents the layers from blending together.
- Create Raspberry Mousse:
- Bloom your gelatin in cold water while you puree raspberries with sugar and lemon juice, pressing through a fine mesh sieve to catch all those seeds. Warm the puree gently, stir in the gelatin until dissolved, then cool to room temperature. Whip your cream to those same medium peaks and fold into the raspberry mixture until uniformly pink and smooth.
- Add Final Layer and Chill:
- Carefully spread the raspberry mousse over your set mango layer, working gently to avoid disturbing the bottom layer. Refrigerate for at least three hours, though overnight is even better if you are planning ahead. The cake is ready when it feels firm and jiggles slightly when you gently shake the pan.
- Decorate and Serve:
- Run a thin knife around the edge of your springform pan before releasing the latch, then carefully lift off the ring. Arrange fresh mango slices and raspberries on top however feels beautiful to you, adding mint leaves if you want that pop of green. Serve chilled and watch your guests faces when you slice through those gorgeous layers.
 Save
Save This recipe has become my signature dessert, the one people request for every birthday and celebration. I love how something so impressive looking is actually just patience and good ingredients working together.
Making It Gluten Free
After discovering my niece has celiac disease, I started making this with a 1 to 1 gluten free flour blend and honestly, no one notices the difference. The sponge might be slightly more delicate, so I handle it a bit more gently when folding in the flour, but the texture remains light and the layers still set up perfectly.
Working With Gelatin
Gelatin intimidated me for years, but the trick is blooming it in cold water first, then dissolving it in warm liquid never boiling. I learned the hard way that boiling destroys the setting power, and now I always keep a close eye on the temperature when warming my fruit purees.
Timing Your Assembly
The biggest challenge is planning your timing, so I start the sponge in the morning, make the mousse layers in the afternoon, and let everything chill until dinner. This approach eliminates rushing and ensures each layer sets properly before the next one goes on, which is absolutely crucial for those distinct stripes.
- Read through the entire recipe before starting, so nothing catches you off guard
- Clear enough refrigerator space for your springform pan before you begin
- Set timers for each chilling stage, because guessing never works with gelatin
 Save
Save Every time I make this cake, I am reminded that the most beautiful things often require just a little patience and care. Watching someone take that first bite, seeing their eyes light up at the layers, that is what keeps me coming back to this recipe year after year.
Recipe FAQs
- → How long does this need to chill?
-
The complete dessert needs at least 3-4 hours of chilling time after the final layer is added. This ensures both mousse layers set properly. For best results, prepare it the day before serving and refrigerate overnight.
- → Can I make this gluten-free?
-
Absolutely! Simply replace the all-purpose flour in the sponge base with a 1:1 gluten-free flour blend. The texture remains light and tender, making it suitable for those avoiding gluten.
- → What if fresh mango isn't available?
-
You can use frozen mango chunks (thawed first) or store-bought mango puree. Ensure the puree is smooth and unsweetened so you can control the sugar level. The flavor will still be delicious and tropical.
- → Can I use frozen raspberries?
-
Yes, frozen raspberries work well. Thaw them completely before pureeing, and strain thoroughly to remove all seeds. The color and flavor remain vibrant, though slightly more tart than fresh.
- → How do I prevent the mousse layers from mixing?
-
Let the first mousse layer set in the refrigerator for 30 minutes before adding the second. This creates a firm surface that prevents blending. Spread the second layer gently with an offset spatula, starting from the center and working outward.
- → How long will this keep?
-
This dessert tastes best within 2-3 days when stored covered in the refrigerator. The sponge may soften slightly over time, but the mousse layers maintain their texture. Avoid freezing as it can affect the smooth, airy consistency.