 Save
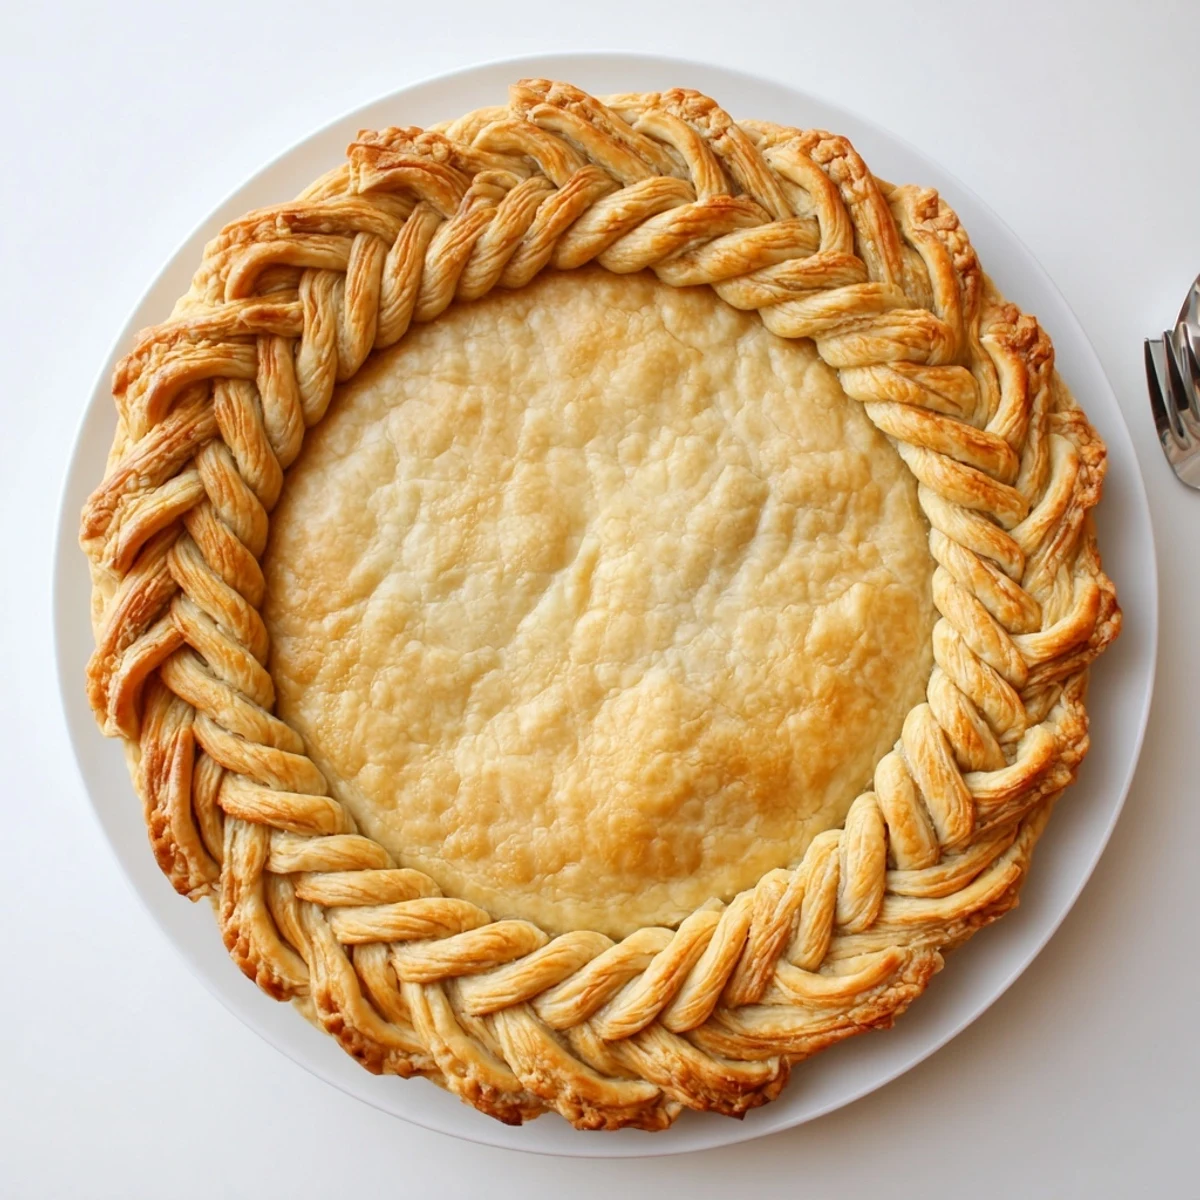
Save Create an impressive decorative edge for your pies with this fishtail braid technique. The method involves cutting twelve even strips of dough, grouping them into sets of four, and weaving them in a distinctive pattern that resembles a fishtail braid. This visually stunning border works beautifully for both sweet fruit pies and savory quiches, adding professional bakery quality to your homemade creations.
The process requires basic pastry skills—making a standard flaky dough, chilling it properly, then carefully cutting and braiding the strips. While it takes practice to master the weaving pattern, the results are worth the effort. You'll blind bake the crust before filling, ensuring a crisp bottom that holds up well with wet fillings.
Customization options include using whole wheat flour for rustic appeal, adding cinnamon to complement sweet fillings, or creating shorter braided sections joined along the edge. The technique yields one 9-inch crust, perfect for gatherings and special occasions where presentation matters.
The first time I attempted a braided pie crust, I was hosting what was supposed to be an elegant autumn dinner party. My kitchen was already a disaster zone, but I was determined to impress my guests with what I'd seen in a fancy French bakery window. The braiding technique felt completely foreign to my clumsy fingers, and I accidentally created what looked like a pie crust gone wrong instead of the elegant masterpiece I'd envisioned. Yet somehow, despite my messy technique and the flour dusted across every surface, that imperfectly braided crust emerged from the oven golden and gorgeous, and my friends couldn't stop talking about it.
Last Thanksgiving, my usually skeptical teenage niece actually paused mid TikTok scroll to ask how I'd managed the bakery-worthy crust on our pumpkin pie. That small moment of kitchen admiration made all the extra minutes of braiding completely worth it.
Ingredients
- All-purpose flour: The foundation of your crust, keep some extra for dusting your work surface
- Cold unsalted butter: Ice cold is nonnegotiable here, warm butter means tough disappointing crust
- Salt: Just enough to make the buttery flavor pop without tasting salty
- Sugar: A subtle sweetness that helps the crust brown beautifully
- Ice water: The secret ingredient that brings everything together without activating gluten too much
- Egg: For that gorgeous golden shine that makes everyone reach for their cameras
- Milk: Thins your egg wash slightly for more even coverage across all those braided details
Instructions
- Prepare your foundation:
- Whisk the flour, salt, and sugar in a large bowl until combined, then work in those cold butter cubes until the mixture looks like coarse crumbs with some pea sized bits remaining
- Bring it together:
- Drizzle in ice water a tablespoon at a time, mixing gently until the dough just holds together when squeezed, then divide into two discs and wrap tightly
- Chill completely:
- Refrigerate for at least one hour, or up to two days, because cold dough is the difference between flaky perfection and a shrinking disappointment
- Roll the base:
- On a lightly floured surface, roll one disc to fit your pie plate, press gently into the bottom and sides, trim the edges, and return to the fridge while you prepare the braiding strips
- Create your strips:
- Roll the second disc to about quarter inch thickness and cut twelve even strips about half an inch wide, grouping them into three sets of four strips each
- Master the fishtail braid:
- Working with one set at a time, pinch the tops together, then take the leftmost strip, cross it over strip two, under strip three, and over strip four, repeating with the new leftmost strip until you reach the end
- Apply and seal:
- Carefully transfer each braid to the chilled pie edge, pressing gently to adhere and using a tiny bit of water if needed to help them stick
- Final chill:
- Refrigerate the completed pie for 15 minutes while preheating your oven to 400°F because cold butter hitting hot oven equals maximum flakiness
- Add the finishing touch:
- Brush the braided crust with your egg wash mixture, getting into all those little crannies for even golden color
- Bake to perfection:
- Bake for 12 to 15 minutes until beautifully golden, adding pie weights if blind baking, then proceed with your chosen filling and baking time
 Save
Save That imperfect first attempt taught me that even when technique doesn't go exactly as planned, homemade food made with care has a way of bringing people together. Now the braided crust has become my signature, requested at every family gathering.
Making It Your Own
Sometimes I swap in whole wheat flour for half the all-purpose flour, which gives the crust a nutty, hearty character that pairs beautifully with apple or berry fillings. The slight trade-off in tenderness is absolutely worth it for that extra depth of flavor.
Sweet vs Savvy
For fruit pies, I love adding a pinch of cinnamon directly into the flour mixture, which perfumes the entire kitchen as it bakes. But when making savory pies like chicken potpie, I skip the sugar entirely and maybe add some herbs to the dough instead.
Assembly Shortcuts
If the full fishtail feels too ambitious, try shorter braids positioned around the crust edge instead of one continuous braid. The effect is still stunning and much less stressful when you're already juggling a complex filling.
- Keep a small bowl of ice water nearby for sealing tricky spots
- Work quickly once dough leaves the refrigerator
- Don't worry if your braids aren't perfectly even
 Save
Save There's something deeply satisfying about transforming simple ingredients into something that looks like it came from a professional bakery window. Your kitchen is going to smell amazing.
Recipe FAQs
- → What is a fishtail braid pie crust?
-
A fishtail braid pie crust is a decorative pastry edge created by weaving strips of dough in an intricate pattern that resembles a fishtail braid. This technique adds visual appeal to pies and creates a professional bakery appearance.
- → How many dough strips do I need for the braid?
-
You'll need twelve long, even strips cut to about 1/2 inch wide. Group them into three sets of four strips each. Each set of four strips creates one braided section that you'll attach to the pie edge.
- → Do I need to blind bake this crust?
-
Yes, blind baking is recommended to ensure the bottom crust stays crisp. Line the crust with parchment paper, add pie weights, and bake at 400°F for 12–15 minutes until golden before adding your filling.
- → Can I make this crust ahead of time?
-
Absolutely. You can prepare the dough discs, wrap them tightly, and refrigerate for up to 3 days or freeze for up to 3 months. Thaw frozen dough overnight in the refrigerator before rolling and braiding.
- → What fillings work best with this decorative crust?
-
This versatile crust pairs beautifully with fruit fillings like apple, cherry, or berry pies, as well as savory options such as quiche Lorraine, spinach and feta, or chicken pot pie. The sturdy braided edge holds up well to both wet and chunky fillings.
- → Can I make this crust gluten-free?
-
Yes, substitute the all-purpose flour with a gluten-free flour blend designed for baking. Keep the butter cold and work quickly, as gluten-free dough can become sticky. You may need to adjust the water amount slightly.